Great product & timely shipping. Cant wait to see carnage they create
These things are unbelievable! I have been running 100 grain out of compound and bought some 125’s for the ole recurve! SMOKIN!!!!!!
In February of 2019, I travelled to Turkey to hunt the Eurasian Wild Boar with my bow. At the time, I believe there were only 3 registered in the SCI Record Book that had been taken with a bow, and I quickly learnt why.
The boar are plentiful, though completely nocturnal. Typically, they are hunted with night vision scopes at long range, but I wanted to do it with a bow and get my name on that short list of bowhunters who had done it. There was going to be no way to hunt them in the daylight, so I had to figure out a few things.
First, I knew my guide would be able to see the boar through his night vision but how would I pick my spot? This was remedied by my guide shining a red laser at the boar right behind his shoulder. But the bigger issue was more difficult to solve. How was I going to shoot my bow in the pitch black of night, aiming at only a red dot in the distance.
At first thought, lighted pins would be an easy solution. However, when you try to shoot your bow in sheer darkness using only lighted pins you quickly realize that you are unable to see your peep and therefore unable to circle it around your sight housing… that was a big issue.
The answer I found worked quite well, as I was able to become the fourth person to have ever taken a Eurasian Wild Boar with a bow (as per SCI Record Book at the time).
The answer was all about anchor points.
When we first learn archery, we are generally taught two or three main anchor points, but they are rarely taught consistently and are often ignored all together. Having solid anchor points is the biggest thing you can do to become a better archer overnight, I mean it.
I have given lessons to a lot of people who show immense improvements in their shooting consistency by rethinking their anchors and sticking to them. Anchor points make your good days better, and your bad days look like good days.
If you are new to archery, you might be wondering what is an anchor point in archery?
An anchor point is a specific point on both your body and your archery equipment that allows you to develop extremely consistent shooting form. The more anchor points you are able to develop, the more consistent your form will be.
Your anchors should be so good that you can draw your bow with your eyes closed, settle in, and when you open your eyes, your peep should be perfectly circled around your sight housing.
Developing this will take one less thing off your mind when you are settling in on that big buck, and help you execute shots faster and more accurately. The first step in how to learn proper archery form, is learning proper anchoring.
Without my three key anchors, I would not have been able to shoot in the dark on that night in Turkey.
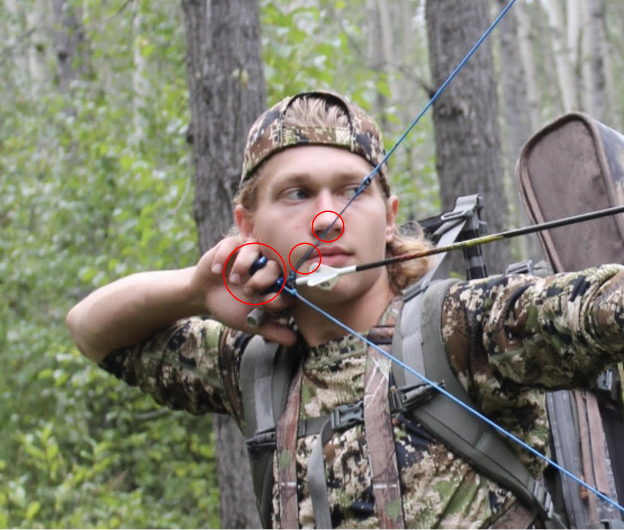
HOW TO FIND ANCHOR POINTSThe first anchor point we need involves your drawing arm. If you are shooting a wrist strap release, you will want to take the big knuckle where your index finger meets your hand and nestle it under your ear lobe.
If you feel the spot on your head right under your ear lobe, there is a divot that seems as though it was made to have your knuckle sit there while shooting. It might be uncomfortable as you are pushing your ear upwards in a funny position, but it is the first anchor you must hit during your shot process and it is absolutely crucial to getting the others set.
If you are shooting a handheld release, the equivalent of this anchor will utilize your index and middle finger, and your jaw bone.
Your index finger and middle finger will naturally form a V when holding your release. The valley of this V where your fingers meet will sit on the back of your jaw bone, straight down about 2 inches from that ear lobe anchor I mentioned before. This is a very solid anchor as well, but may take a bit of adjustment to find it. When you find it, you will know.
The second and third anchor points will happen together. First, the tip of your nose should be touching the string. If you press right on the tip of your nose, there is a little divot in the cartilage, and that is the divot that you want to be touching your bow string.
You should not be putting much pressure on the string with your nose, just enough so that you can feel it. Far too often I see guys who pull their string past their nose, and their string touches their nose but straddles the side of it.
This likely means your draw length is too long and needs to come in ½-1”. The side of the nose is not a consistent anchor point the way the tip is, and using the side of your nose as an anchor does not position your head properly for shooting.
You will often see archers who shoot like this having to tilt their head a bit. Using the tip of your nose allows for better consistency, and better posture.
The third anchor is the corner of your mouth. It should also be touching the string. I don’t mean ‘approximately’ the corner of your mouth, I mean if you were to have a fishhook in the corner of your mouth pulling you, that is the spot your string should be touching.
You should be able to settle into the second and third anchor simultaneously after your hand anchor is set either on your jawbone or under your ear.

I used all those anchors for about five years and had great success. I developed consistency in my anchors to the point where I would draw with my eyes closed, open them, and feel like I was right on.
However, when it came time to practice shooting in the pitch black of the Turkish countryside, I realized that although my anchors felt perfect to me, they were not. As soon as I couldn’t see my peep’s circle, I was unable to make the micro adjustments in my form that would circle my peep around my sight housing.
A small error in that alignment can cause an alarmingly large miss. It is essentially the equivalent to how a parallax works on a rifle scope.
After our first night of hunting, I had missed a boar at 30-some yards and I wanted to back off before going out again the next night. We visited the Antalya Centennial Archery field where I had the coolest shooting session of my life nestled in downtown Antalya. There, I used some serving thread and super glue that I had taken with me to lock in my anchors for good.
Here is what I did.
I would draw my bow, and settle into my anchors perfectly. I then had my dad use a silver Sharpie to mark the exact spot that the corner of my mouth and the tip of my nose were touching the string.
Then, I used the serving to tie a very small nock-set (see our YouTube video on how to do this) on each spot. I used a very small dab of super glue on each nock-set to lock them in place.
Now, I was able to draw my bow with my eyes closed and I could feel my anchors like never before. Previously, it had been that my anchors were the precise points of the tips of my nose and corner of my mouth, but not placed on any precise spot on the string.
There was now a point of consistency for every anchor on my body, and on my bow. These little nock-sets allowed me to feel my anchors in the dark, and I was able to make a double-lung shot on a boar in the dark that night.
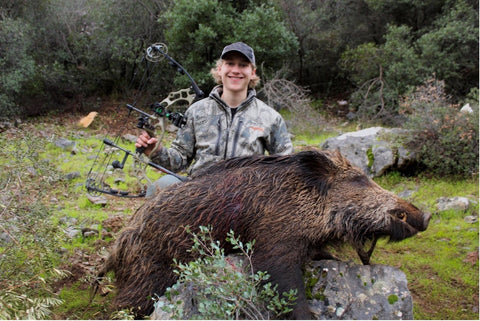
My archery boar from Turkey, recovered the next day as they can be very dangerous to recover if wounded.
The impact that these little nock-sets had on my shooting was profound. I shot better at long range almost immediately, and I had far less bad days at the range.

Some local kids were playing on the field and stayed to watch my practice, one of the coolest archery experiences I have ever had at the Antalya Centennial Archery Field.
Now, you may be thinking this just sounds like I am using a kisser-button or another commercial product that is intended to give you a physical anchor point on your string. Well, yes that is basically it but here is this method is better than a kisser button.
First, it is free. You don’t need to spend any money if you have some serving or even non-waxy dental floss lying around.
Second, it doesn’t add any real weight to the string. When we add weight to a bowstring, it can increase the speed of the bow or slow it down depending on where the weight is placed.
Weight placed near the cams increases their momentum and therefore your arrow speed (that is what those little rubber covered strips that protrude from your string near your cams are).
But there is a threshold point on the string as you move towards the center of it where added weight will slow your bow down. Rubber kisser buttons are much heavier than a small knot of serving, and they do slow bows down.
Third, these little nock-set are much smaller points than rubber kissers which can get quite large. The tininess of these nock-sets is exactly why they work so well. They give you an EXACT point at which to place your lip and nose, not some large rubbery general area.
This last point may be slightly off topic, but I feel that it is important to mention in this conversation. When we first learn archery, we are taught to stand square to the target, feet shoulder width apart.
As you develop as an archer, it is common to hear that you should open up slightly to the target, engaging your back muscles better, tending to a smoother draw and a better release using back-tension. This is all true, and great advice.
However, it is rare in a bowhunting scenario to take a shot on perfectly flat ground where you can set yourself up without any hitch in your footing.
I choose to not consider my foot position in my shot form, do not consider it any part of an anchor or any part of your shooting that needs to be consistent.
When I practice, I shoot in all sorts of strange positions. Shoot sitting on one knee, or on both. Try shooting sitting right down, flat on your butt (this one is harder than it seems, but remarkably valuable on spot and stalk hunts). Try shooting on a steep incline where one foot it much higher than the other.
Your shooting form should revolve entirely around your upper body, and your lower body’s job is to accommodate whatever situation you are in so that your upper body can remain constant, and your anchors can be set for you to take a good shot.
Remember, shooting at the range should be more than just that. We are rarely presented with a range-like shooting scenario, and we should be prepared in as many ways as we can for any conditions that we might need to take that once in a lifetime shot.
If you have any questions or would like to discuss the topic further, please feel free to reach out to us at sales@toothofthearrowbroadheads.com
We are always more than happy to talk arrows and broadheads with fellow bowhunters!
If you liked this article, make sure to subscribe below to receive more helpful bowhunting tips, hunting news, and product releases.